In an effort to make your project run more smoothly, the following is recommended:
- Stage All Parts and Pieces
1. Unload all products onto your job site and sort by product number.
2. Check in and count all products for accuracy and damage prior to the delivery truck leaving. Note any damage on the drivers BOL.
3. Keep and maintain a clutter free staging area. It will help your installation go more smoothly.
4. Protect all building walls and surfaces where product is leaning against them with cardboard or packing blankets. - Panels & Connectors
Installation: Start at a right angle condition in your layout. It is recommended that you identify the location using your plan to locate the connection in the office area.
1. Using a 2, 3 or 4 way connector, loosen the draw block at the top (finished end ) of the connector with your allen wrench. The connector should easily fit over the panel wedge blocks on the end of your first panel. Tighten connector onto panel. a. Loosen the the draw block at the top of the connector. b. Attach connector to panel. c. Tighten connector to panel.
2. Add a second panel onto the connector by loosening the other draw block at the top of the connector. Install the panel in a similar manner to 1. You now have the start of your fist station. a. Loosen the draw block at the top of the connector. b. Attach panel to connector to begin your first panel run. c. Tighten connector to panel.
3. Using your panel plan as reference, determine where the next panel goes. Install the panel in a panel run as follows: using the draw rod, open the rod so it will loosely fit over the panel you have installed. With the help of another installer, add the next panel in a straight line. Make sure the boot and the top of the panel are aligned with you panel; adjust the panel glides, if needed. Tighten draw rod and block to connect the two panel. a. Attach draw rod to existing panel. b. install next panel in panel run. c. align panel and attach draw rod. d. Tight draw rod to secure the panel. Check draw rod to and bottom block to ensure they are seated correctly.
4. Install the finished end cap. To install, loosen the top of the end cap with your allen wrench. Set the bottom of the end cap on the bottom wedge block on the panel. Move the end cap and set over the top block of the panel and tighten. a. Loosed top of end cap. b. Attach end cap at bottom of panel. c. Install over top wedge block on panel. d. Tighten end cap on panel.
5. Level panels are required. Turn leveling glide with 10mm wrench to adjust as needed. Also, realign your panels for location and square in the installation. Refer to you installation plans for location. Double check your work now; it will save time later. Level both to the earth, but also visually. a. level as needed, using wrench to move glide up or down.
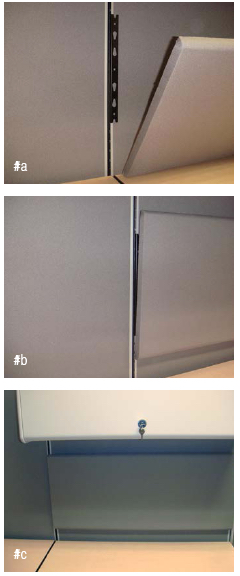
6. Wall Start Application require some additional tools. The most important are a good tape measure, level and a drill. The wall should be reinforced to prevent damage or injury. Locate on your cubicle installation plan the wall start. Measure the wall, and very lightly with a pencil, mark the location of the wall start. Take a panel and level it to the wall to determine the mounting height of the wall start; lightly mark the wall at the top of the panel. Locate the top 2 holes of the wall start and mark on the wall for positioning. Install you fastener to the wall at this location and install the top of the wall start. Next, level the wall start and repeat this step on the bottom block. a. After lining up the location of the wall, start mount the top block first. b. Next attach the bottom block. c. Cut and attach the filler strip as needed.
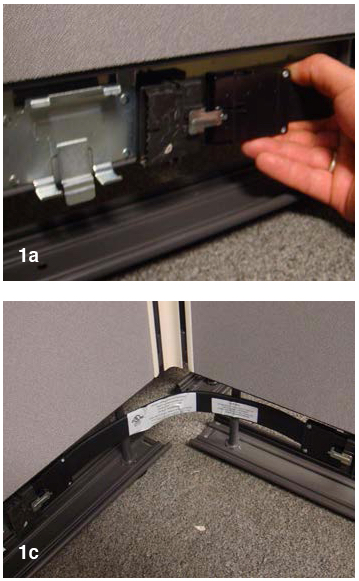
7. When installing a variable height connection, you must remove the trim on the side of the connector you are going to attach at a variable height (always use the connector for the tallest panel you are attaching to.) To remove the filler strip, squeeze it at one end and pull toward you. Once the strip is removed, you need to unbolt the top wedge block assembly on the side you are lowering. Use a #3 phillips head screwdriver to do this. Once the block is removed, remove the connector top cap by pressing gently on the location pin to release it. Using the back of the filler strip, push the threaded plate on to the sticky tape (align to fit in connector). Using the filler strip as your guide, insert the threaded plate into the connector to the desired height connection. Reinstall the connector top wedge block using the existing screws and parts. When the wedge block is securely tightened in place, gently pull the filler strip to release it. Using a carton knife or a cutting tool, cut the filler strip to the appropriate length and reinstall the filler strip on the connector. See the next page for further installation instructions on this procedure. a. Remove the black filler strip from the side of the connector. b. Remove the top wedge block assembly. c. Remove the connector top cap. d. Place threaded connector plate on the black side of the filler strip to use as an alignment guide for installation. e. Using filler strip as your guide, place the threaded plate onto the connector at the correct location.
8. To install you variable hight condition, attach the connector to you existing panel run. Use 2 people if needed. Attach the next panel in the run. using a standard allen wrench or a ratchet, attach the panels in the variable height location as shown. a. Attach connector to existing panel run and attach the next panel in the run. b. Attach the panels at the variable height locations. c. Tighten the panel wedge block to finish the installation.
9. To install the variable height trim, take the trim strip and place it upside down on the connector, measure the length to the top and draw a line to mark for cutting. Using a small hack saw or other appropriate cutting tool, cur the trim to length. Remove the paper from the tape and align with the variable height location on the connector and press into place. a. Cut to length. b. Remove tape. c. Align with connector. d. Press into place.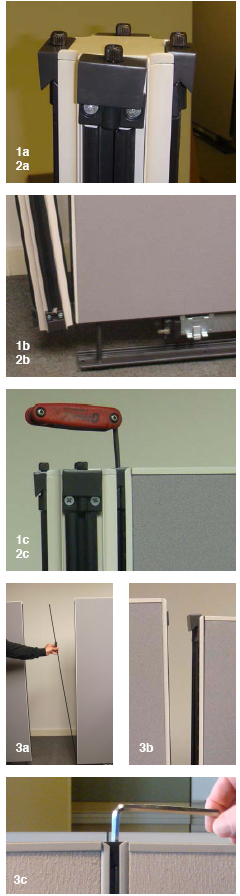
- Basic Electrical Installation
Once you have installed the cubicle panels and connectors and have leveled the system, you can begin to install the festoons. There are two types, panel to panel and panel through post, both installed in a similar manner. Under no circumstances should you ever install 2 cubicle festoons on both side of 2 connecting power harnesses or on all 4 sides of a 4- way cubicle connection, or on 3 dies of a 3- way cubicle connection or on 2 sides of a 2 way cubicle connection. This will cause a short circuit. Place the festoon gently onto one end of the panel power harness and push until it locks into the sliver locking clip. Repeat on the next panel. a. Push the festoon onto the cubicle power harness on each panel. b. Make sure the clip is locked over the festoon to secure it. c. View of corner connection using a panel to panel festoon. d. Not shown: longer 23″ festoons are used to carry the electrical power through a 3 or 4 way cubicle connector in a straight line.
- Receptacle Installation
Install the receptacle into the side of the power harness with the number or letter in the up position. Align the lower tab on the receptacle with the mechanical connection on the power harness. a. insert the receptacle into the power harness. b. Secure the connection to lock the receptacle into place. Slide the receptacle until it locks into the spring clip via the mechanical connection.
- Cubicle Connector Trim Installation
Begin installing the cubicle connector trim pieces as show in the following diagrams. Gently place the ends of the specific connector trim over the tabs on the end of the connector stem. ( this is for 2 and 3 way cubicle concerns only; 4- way connectors do not have trim). You may have to bend the cover slightly to place it over the tab; use caution to avoid breaking the cover. Once the cover is in place, rate the cover upward and lock into place at the upper part of the cubicle connector stem.
a. Place connector trim over the tabs on the bottom of the connector stem.
b. Place trim over tabs.
c. Rotate cover into the top of the connector stem and lock into place.
d. Connector when it’s locked in place.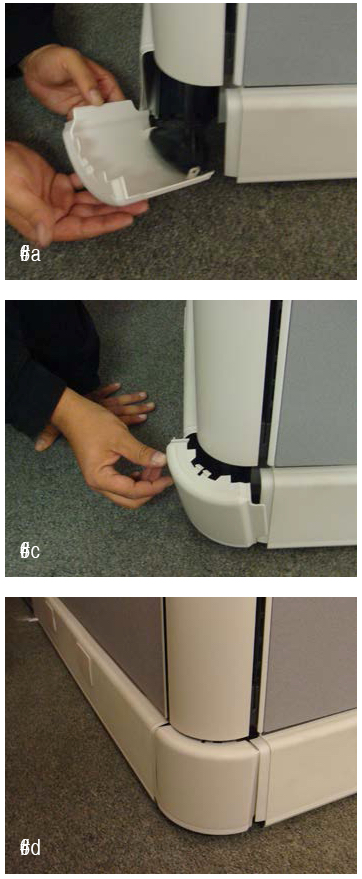
- Install Cubicle Base Trim
Once the energy is installed as needed and the connector trim covers are on, you can begin installation of the raceway covers.
To instal non-powered cubicle raceway, gently push the groove in the bottom of the raceway cover onto the rolled edge of the bottom of the raceway. Take care to like up the ends of the covers with the ends of the panel.
a. Gently push the raceway cover, starting at one end onto the rolled edge of the raceway.
b. Roll the cover up into position to lock into the lower edge of the panel.
c. Gently tuck the lip on the top of the raceway cover under the metal edge at the bottom of the panel.
d. When finished, the raceway cover will stay in place by itself.
All installation of the powered raceway covers is identical to the procedure listed above for the non-powered raceway covers except alignment with the receptacles or the base power entry are critical for installation.
a. Alignment with receptacles or base power entry are critical.
b. Once alignment is complete, install like the non-powered covers listed above.
c. Install Windwo covers as needed; this can be done either before or during base cover installation.
d. Install cover as above in 3.1 through 3.4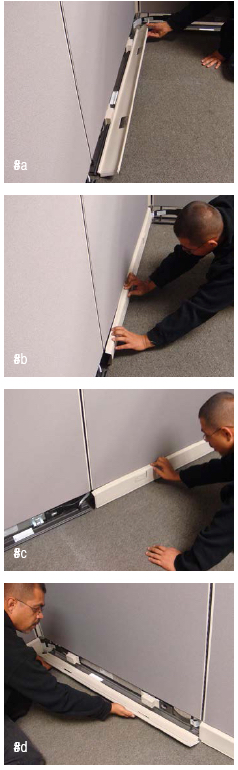
- Install Cubicle Finished End Trim Covers
To install the cubicles finished end trim cover, locate the tabs at the bottom of the raceway end cap. Place them into the holes in the raceway at an end cap location.
a. Place the tabs on the bottom of the end cap into the holes on the raceway.
b. Rotate the end cap up to the bottom of the panel.
c. Lock end cap into the tab at the bottom of the panel. Adjust tab with flat trip screwdriver if needed for a trim fit.
d. Finished end trim cover when it’s installed.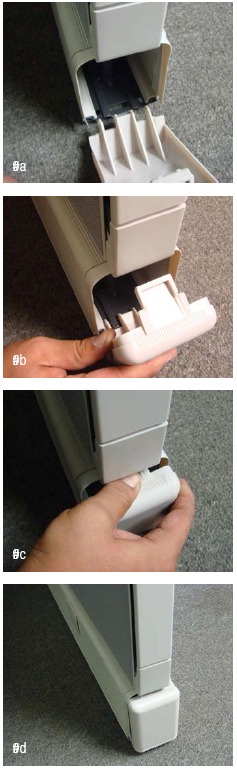
- Install Cubicle Work Surfaces
a. To install the cubicle corner bracket provided in the corner at the desired height. Ensure all bracket hooks are fully seated in the slots.
b. Install Cubicle cantilever bracket on the hanger frame by inserting the tab on the top hook of the cantilever bracket into the hanger frame slot at the desired height.
c. rotate bottom of cantilever bracket into frame to engage all hooks. Repeat procedure for cantilever on the other side of the work surface.
d. For corner work surfaces 60″ – 84″ wide, install center support on center frame at the same height as the cantilevers on the right and left sides.
e. Push down on all work surface supports to ensure all hooks are fully seated in slots.
f. Install shoulder screws at the back of the pre-drilled holes. Do not install front spacer yet.
g. Install worksurface on the cantilever brackets by inserting shoulder screws into keyhole slots in rear of cantilever brakes. Push work surface back until front spacers or pre drilled holed align with holes in the cantilever brackets. Install front spacers.
h. For 60″ wide or greater work surfaces, align center support.
i. level work surfaces by adjusting the leveling screw at the top of the front cantilever brackets.
j. Install adjacent work surface as required.
k. Attach ganging plates between adjacent work surfaces.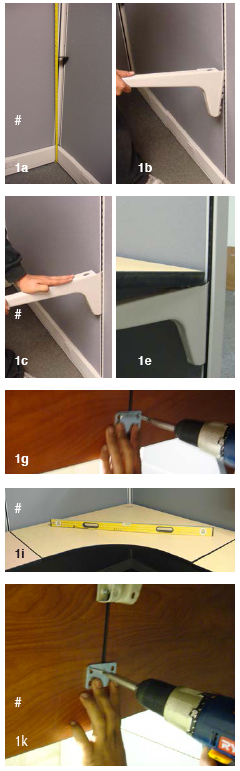
- Install Cubicle Filing Cabinets
All pedestals and support lateral files require attachment to the work surface they are supporting. It is important that you check your pedestal height in step 4 work surface installation. If the height is incorrect you will have to reset the height of the work surface accordingly. First step is to open the drawer on your pedestal. Remove the top two boxes drawers or the file drawer depending on your configuration. using the screws provided and with the pedestal in place, attach the screws at the front and the rear of the pedestal to support it. Replace the drawers.
a. Open pedestal.
b. Remove the drawer by lifting the dislodged bracket and pulling forward on the drawer.
c. Insert the mounting screws into the location at the front and rear of the cubicle pedestal.
d. Carefully re-insert the drawer into the track.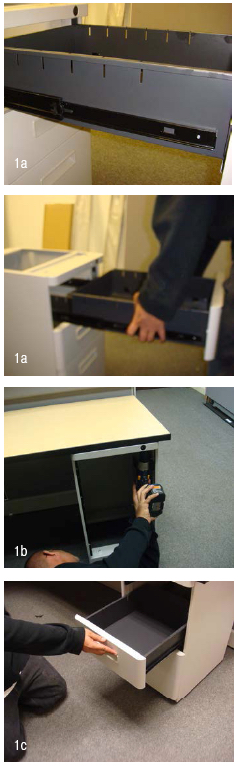
- Install Cubicle Tack Boards and Marker Boards
Insert the tack board mounting brackets on the top panel hanger frame at the desired location. Attach the shoulder screws to the tack board approximately 4″ from the top of the tack board, about 1/2″ in from the edge of the tack board, the second screw is located exactly 7″ below the first. Slide the tack board screw into the tear drop of the tack board bracket and the top both of the bracket. Check to make sure the tack board is level.
a. Insert the bracket on to the panel.
b. Attach the tack board to the top notch and lower tear drop.
c. Completed tack board should look level.